Hyundai Santa Fe: Charging System / Alternator. Repair procedures
Hyundai Santa Fe (TM) 2019-2025 Service Manual / Engine Electrical System / Charging System / Alternator. Repair procedures
| Removal |
|
| 1. |
Turn the ignition switch OFF and disconnect the battery (-) terminal.
|
| 2. |
Remove the drive belt.
(Refer to Engine Mechanical System - "Drive Belt")
|
| 3. |
Disconnect the alternator connector (A).
|
| 4. |
Remove the cable nut (A) from the alternator "B" terminal.
|
| 5. |
Remove the alternator mounting bolts.
|
| 6. |
Remove the alternator (A).
|
| Installation |
| 1. |
Install in the reverse order of removal.
|
| Disassembly |
| 1. |
Remove the shaft cap (A).
|
| 2. |
Remove the OAP pulley (A).
|
| 3. |
Remove the alternator cover (A) after loosening the mounting nut.
|
| 4. |
Remove the regulator assembly (A).
|
| 5. |
Remove the stator leads (A).
|
| 6. |
Remove the 4 through bolts (A).
|
| 7. |
Separate the rotor (A) and cover (B).
|
| Reassembly |
| 1. |
Reassemble in the reverse order of disassembly.
|
| Inspection |
Rotor
| 1. |
Check that there is continuity between the slip rings (C).
|
| 2. |
Check that there is no continuity between the slip rings and the rotor
(B) or rotor shaft (A).
|
| 3. |
If the rotor fails either continuity check, replace the alternator.
|
Stator
| 1. |
Check that there is continuity between each pair of leads (A).
|
| 2. |
Check that there is no continuity between each lead and the coil core.
|
| 3. |
If the coil fails either continuity check, replace the alternator.
|
 Battery. Description and operation
Description
AGM Battery
AGM battery is used for especially heavy load on the vehicle network depending
on equipment and requirements...
Other information:
Hyundai Santa Fe (TM) 2019-2025 Service Manual: Delivery Pipe. Repair procedures
Removal 1. Release the residual pressure in fuel line. Release the residual pressure in fuel line. 2. Turn the ignition switch OFF and disconnect the battery (-) terminal. 3...
Hyundai Santa Fe (TM) 2019-2025 Owner's Manual: System malfunction and limitations
System malfunction When Lane Following Assist is not working properly, the ‘Check Lane Following Assist (LFA) system’ (or ‘Check LFA (Lane Following Assist) system’) warning message will appear on the cluster. If this occurs, we recommend that the system be inspected by an authorized HYUNDAI dealer...
Categories
- Manuals Home
- 4th Generation Santa Fe Owners Manual
- 4th Generation Santa Fe Service Manual
- Troubleshooting
- Electronic child safety lock
- Child-protector rear door locks
- New on site
- Most important about car
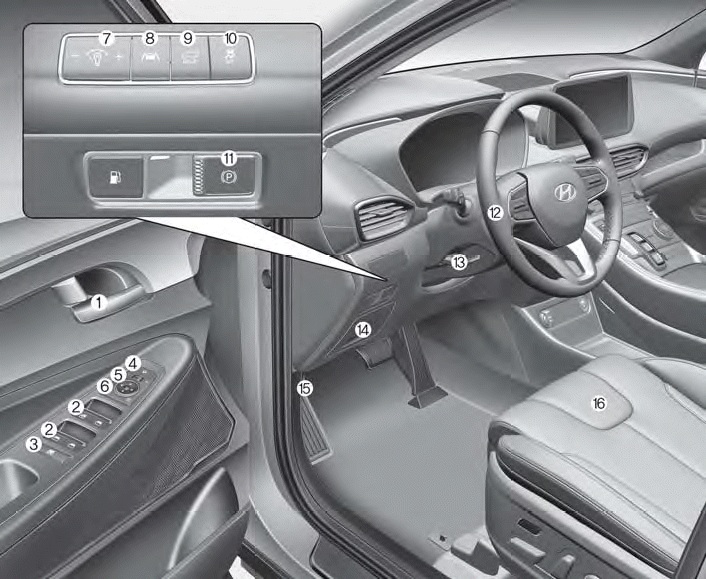
Interior Overview

1. Inside door handle
2. Power window switches
3. Power window lock button/Electronic child safety lock button
4. Side view mirror folding button
5. Side view mirror control switch
6. Central door lock switch
7. Instrument panel illumination control switch
Copyright © 2025 www.hsafe4.com


