Hyundai Santa Fe: Lubrication System / Oil Pan. Repair procedures
Hyundai Santa Fe (TM) 2019-2025 Service Manual / Engine Mechanical System / Lubrication System / Oil Pan. Repair procedures
| Removal |
|
| 1. |
Disconnect the battery negative "-" terminal.
|
| 2. |
Remove the drive belt.
(Refer to Timing System - "Drive Belt")
|
| 3. |
Disconnect the compressor ECV connector, and then by loosening the mounting
bolts, widen the gap between the compressor from the engine to remove
the A/C compressor bracket.
(Refer to Air Conditioning System - "Compressor")
|
| 4. |
Remove the A/C compressor bracket (A).
|
| 5. |
Remove the dust cover (A).
|
| 6. |
Remove the oil pan (A). Insert the blade of SST (09215-3C000) between
the ladder frame and oil pan. Cut off applied sealer and remove the
lower oil pan.
|
| Installation |
| 1. |
Install the oil pan.
|
| 2. |
Install the A/C compressor bracket (A).
|
| 3. |
Install the A/C compressor mounting bolts.
(Refer to Heateng, Ventilation, Air conditioning - "Compressor")
|
| 4. |
Refill engine with engine oil.
|
 Oil Pump. Repair procedures
Removal
•
Be careful not to damage the parts located under the vehicle
(floor under cover, fuel filter, fuel tank and canister) when
raising the vehicle using the lift...
 Oil Pressure Switch. Repair procedures
Removal and Installation
•
Be careful not to damage the parts located under the vehicle
(floor under cover, fuel filter, fuel tank and canister) when
raising the vehicle using the lift...
Other information:
Hyundai Santa Fe (TM) 2019-2025 Owner's Manual: Air bag - supplemental restraint system
1. Driver’s front air bag 2. Passenger’s front air bag 3. Side air bag 4. Curtain air bag The vehicles are equipped with a Supplemental Air Bag System for the driver’s seat and front passenger’s seats. The front air bags are designed to supplement the three-point seat belts...
Hyundai Santa Fe (TM) 2019-2025 Service Manual: General information
General Troubleshooting Information Before Troubleshooting 1. Check applicable fuses in the appropriate fuse/relay box. 2. Using the battery checker (MCR-570 KIT), check the battery for damage, state of charge, and clean and tight connections...
Categories
- Manuals Home
- 4th Generation Santa Fe Owners Manual
- 4th Generation Santa Fe Service Manual
- Folding the side view mirror
- Electronic Parking Brake (EPB) warning light. AUTO HOLD indicator light
- Electronic child safety lock
- New on site
- Most important about car
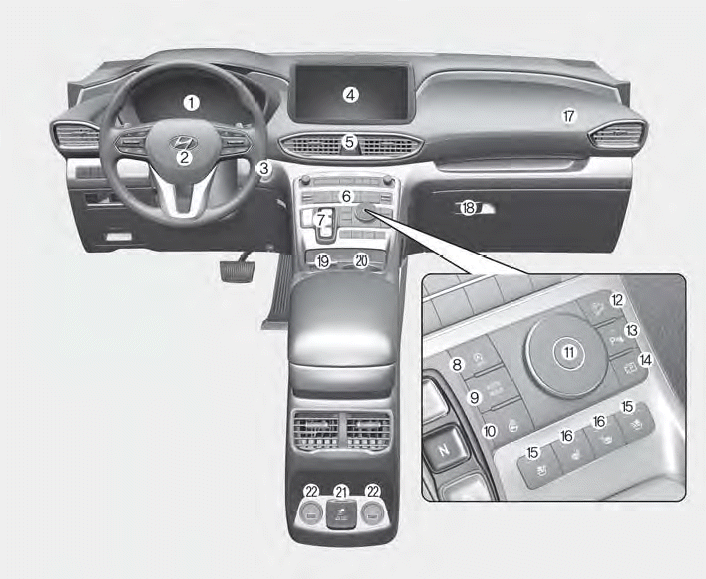
Instrument panel overview

1. Instrument cluster
2. Driver’s front air bag
3. Engine Start/Stop button
4. Infotainment system
5. Hazard warning lamp switch
6. Climate control system
7. Shift button
8. ISG (Idle Stop and Go) button
9. Auto Hold button
10. Heated steering wheel button
11. Drive mode button
12. DBC (Downhill Brake Control) button
13. Parking Safety button
14. Parking/View button
15. Air ventilation seat button
16. Seat warmer
17. Passenger’s front air bag
18. Glove box
19. Wireless charging system pad
20. Cup holder
21. AC inverter
22. USB charger
Copyright © 2025 www.hsafe4.com


