Hyundai Santa Fe: Tail Gate Window Glass / Repair procedures
Hyundai Santa Fe (TM) 2019-2025 Service Manual / Body (Interior and Exterior) / Tail Gate Window Glass / Repair procedures
| Removal |
|

|

| 1. |
Remove the tailgate trim.
(Refer to Tailgate - "Tailgate Trim")
|
| 2. |
Remove the rear spoiler.
(Refer to Body Side Molding - "Rear Spoiler")
|
| 3. |
Disconnect the hot wire connector (A).
|

| 4. |
Cut off the sealant on the edge (B) while pulling the piano wire (A)
to the left and right.
|

| 5. |
Put in a piano wire (A) through the corner of the tailgate window glass
and insert wire grips into both ends of the wire.
|

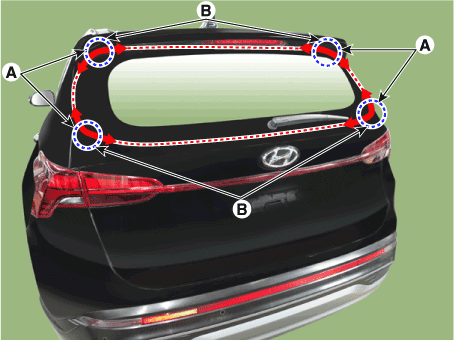
| 6. |
Cut off the sealant on (A-A), (B-B), (C-C), while pulling a piano wire
(A) to the left and right.
|

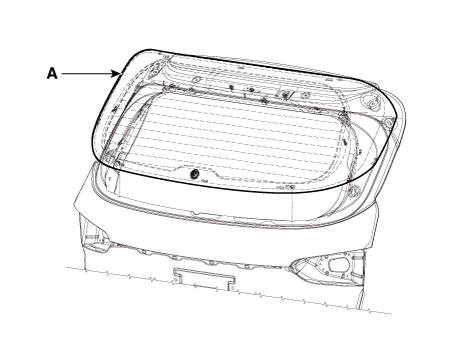
| 7. |
Remove the tailgate window glass (A).
|
| Installtion |
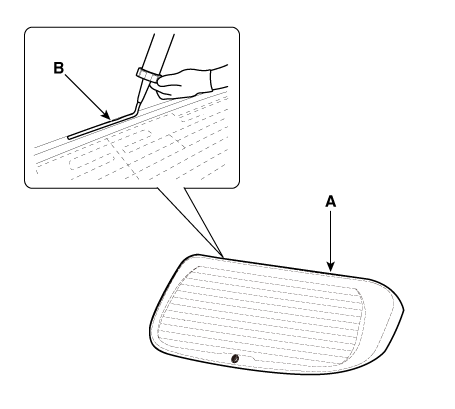
| 1. |
Using a cutting knife (A), remove the remaining sealant (B) on the body
panel.
|

| 2. |
Apply the body primer to the bonding surface of body panel.
|

| 3. |
Apply the glass primer to the outer edge of tailgate window glass.
|

| 4. |
Using a sealant gun, apply the sealant (B) to the edge of rear tailgate
window glass (A).
|
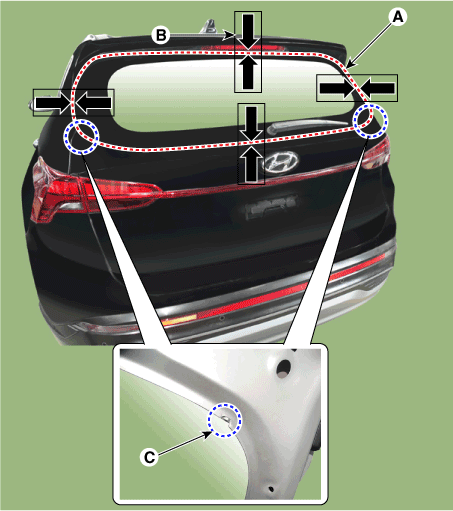
| 5. |
Using the glass holder, adjust the tailgate window glass (A) to fit
the alignment marks (B) on the body and lightly push the tailgate window
glass to make the edges fully seated on the bonding surface of body.
|
| 6. |
To make sure that the applied sealant is completely hardened, leave
the car on a flat surface for at least 3 to 4 hours after installing
the tailgate window glass.
|
| 7. |
Conduct a leak testing.
|
| 8. |
Install the rear spoiler.
(Refer to Body Side Molding - "Rear Spoiler")
|
| 9. |
Install the tailgate trim.
(Refer to Tailgate - "Tailgate Trim")
|


Other information:
Hyundai Santa Fe (TM) 2019-2025 Service Manual: MDPS PowerPack Assembly. Repair procedures
Replacement 1. Turn the ignition switch OFF and disconnect the battery negative (-) cable. 2. Turn the steering wheel so that the front wheels are placed in the straight ahead position...
Hyundai Santa Fe (TM) 2019-2025 Service Manual: ESP OFF Switch. Description and operation
..
Categories
- Manuals Home
- 4th Generation Santa Fe Owners Manual
- 4th Generation Santa Fe Service Manual
- System settings
- Resetting the power liftgate
- Troubleshooting
- New on site
- Most important about car
Air bag - supplemental restraint system

1. Driver’s front air bag
2. Passenger’s front air bag
3. Side air bag
4. Curtain air bag
The vehicles are equipped with a Supplemental Air Bag System for the driver’s seat and front passenger’s seats.
The front air bags are designed to supplement the three-point seat belts. For these air bags to provide protection, the seat belts must be worn at all times when driving.

Copyright © 2025 www.hsafe4.com