Hyundai Santa Fe (TM): If you have a flat tire (with Tire Mobility Kit) / Checking the tire inflation pressure
1. After driving approximately 4~6 miles (7~10 km or about 10 minutes), stop at a safe location.

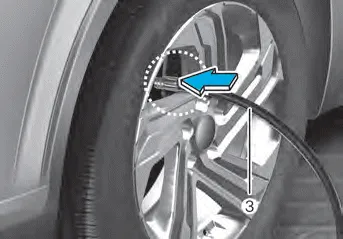
2. Connect the connection hose (3) of the compressor and tire into the tire valve.
3. Connect cables (4) to the battery.
4. Adjust the tire inflation pressure to the recommended tire inflation.
With the engine running, proceed as follows.
-- To increase the inflation pressure:
Switch on the compressor. To check the current inflation pressure setting, briefly switch off the compressor.
-- To reduce the inflation pressure:
Adjust the valve (9) for reducing tire inflation pressure.
NOTICE
Do not let the compressor run for more than 10 minutes, otherwise the device will overheat and may be damaged.
Information
The pressure gauge may show higher than actual reading when the compressor is running. To get an accurate tire pressure, the compressor needs to be turned off.
CAUTION
If the inflation pressure is not maintained, drive the vehicle a second time, refer to Distributing the sealant. Then repeat steps 1 to 4.
Use of the TMK may be ineffectual for tire damage larger than approximately 4 mm (0.16 in).
We recommend that you contact an authorized HYUNDAI dealer if the tire cannot be made roadworthy with the Tire Mobility Kit.
WARNING
The tire inflation pressure must be inflated to the proper pressure (Refer to “Tire and Wheels” section in chapter 2). If it is not, do not continue driving. Call for road side service or towing.
CAUTION
Tire pressure sensor
The sealant on the tire pressure sensor and wheel should be removed when you replace the tire with a new one and inspect the tire pressure sensors. We recommend that you get this done at an authorized dealer.
Information
When reinstalling the repaired or replaced tire and wheel on the vehicle, tighten the wheel bolt to 79~94 lbf.ft (11~13 kgf.m).
WARNING Detach the speed restriction label (1) from the sealant bottle (2), and place it in a highly visible place inside the vehicle such as on the steering wheel to remind the driver not to drive too fast.
Towing service [A] : Dollies If emergency towing is necessary, we recommend having it done by an authorized HYUNDAI dealer or a commercial tow-truck service.
Other information:
Hyundai Santa Fe (TM) 2019-2023 Service and Repair Manual: Mode Control Actuator. Repair procedures
Inspection 1. Turn the ignition switch OFF. 2. Disconnect the mode control actuator connector. 3. Verify that the mode control actuator operates to the defrost mode when connecting 12V to terminal 3 and grounding terminal 7.
Hyundai Santa Fe (TM) 2019-2023 Service and Repair Manual: Heater & A/C Control Unit (DATC). Repair procedures
Self Diagnosis 1. Self-diagnosis process. • When operating the self-diagnostics, the below fault(self-diagnostics code) will blink at 0.
Categories
- Manuals Home
- Hyundai Santa Fe Owners Manual
- Hyundai Santa Fe Service Manual
- Driver assistance system
- Forward Collision-Avoidance Assist Settings
- Heating,Ventilation And Air Conditioning
- New on site
- Most important about car
