Hyundai Santa Fe: Floor Console / Floor Console Assembly. Repair procedures
Hyundai Santa Fe (TM) 2019-2025 Service Manual / Body (Interior and Exterior) / Floor Console / Floor Console Assembly. Repair procedures
| Replacement |
[Rear Floor Console Assembly]
|

|

| 1. |
Remove the console upper cover (A).
|

| 2. |
Press the lock pin, separate the connectors (A).
|

| 3. |
Remove the console armrest lock assembly (A).
|

| 4. |
Remove the console armrest tray (A).
|

| 5. |
Remove the storage box mat (A).
|

| 6. |
Loosen the mounting bolts and screw, remove the rear floor console assembly
(A).
|

| 7. |
Press the lock pin, separate the connector (A).
|

| 8. |
To install, reverse removal procedure.
|

[Front Floor Console Assembly]
|
|
| 1. |
Remove the console side cover (A).
[LH]
[RH]
|


| 2. |
Press the lock pin, separate the connector (A).
|

| 3. |
Loosen the mounting screws, remove the front floor console assembly
(A).
|

| 4. |
Press the lock pin, separate the connectors (A).
|

| 5. |
To install, reverse removal procedure.
|
 Floor Console Assembly. Components and components location
Component Location (1)
1. Front Console
Assembly
Component Location (2)
1...

Other information:
Hyundai Santa Fe (TM) 2019-2025 Service Manual: Transaxle Control Module (TCM). Description and operation
Description • Monitoring the vehicle's operating conditions to determine the optimal gear setting. • Performing a gear change if the current gear setting differs from the identified optimal gear setting...
Hyundai Santa Fe (TM) 2019-2025 Owner's Manual: Tilt / Telescopic steering
When adjusting the steering wheel to a comfortable position, adjust the steering wheel so that it points toward your chest, not toward your face. Make sure you can see the instrument cluster warning lights and gauges. After adjusting, push the steering wheel both up and down to be certain it is locked in position...
Categories
- Manuals Home
- 4th Generation Santa Fe Owners Manual
- 4th Generation Santa Fe Service Manual
- Folding the side view mirror
- Head-up display settings
- Smart liftgate
- New on site
- Most important about car
Armrest
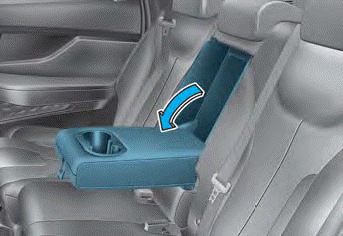
The armrest is located in the center of the rear seat. Pull the armrest down from the seatback to use it.

Copyright © 2025 www.hsafe4.com